

If you split your time between two or more countries it can be a real hassle to manage your online life. Not only do you run the risk of triggering security processes employed by banks, etc but it can also be a struggle to use things like online streaming services which you’re paying for or entitled to use.
But did you know you could also be exposing yourself to data theft by 3rd parties using WiFi in places like hotels and shops?
For these reasons and more, it’s relatively easy to setup your own VPN server.
There are a few requirements for this:
- A residence in your home country which has an internet connection with at least a 2mbps UPLOAD speed, this will be enough for general web browsing and SD video content. For HD video you’ll need at least a 5mbps upload speed.
- A Raspberry Pi PC – I recommend this starter kit, which comes with everything you’ll need
- An ethernet cable to connect to your router
- A monitor, keyboard and mouse to setup your Pi (you’ll only need this during setup)
- A bit of knowledge of home routers in order to make some changes (Google will be sufficient in most cases).
A note on Raspberry Pi
I’m a huge fan of Raspberry Pi, I pre-ordered the original model back in 2012 and received it on day one thanks to a friend who worked at RS components. At last count I have six dotted around, each fulfilling a different role.
The Pi is a single-board-computer (SBC) designed for the education sector, but it’s often used for hobbyists as a cheap alternative to a full PC. The Pi uses its own purpose-built operating system, which can be difficult to get your head around if you’re not used to programming, but thanks the guides like this one its relatively straight forward for “n00bs” to make use of them.
Setting up the Pi
I’m going to assume that the Pi you’re using is already running the default Operating System – Raspbian. If you buy a kit like the one mentioned above then the system should take you through the installation of Raspbian on first boot.
If you haven’t got a working Raspbian OS then follow this guide here as there’s no point me repeating what the Raspberry Pi Foundation have already done.
If all is well then you should see a desktop like this one:

Before installing any new software on a Raspberry Pi it’s a good idea to make sure the latest updates are installed. To do this, open a Terminal window (the black logo, 4th from the left on the taskbar), then type the following command:
sudo apt-get updateThis will search the Raspbian online repositories and download a catalogue of the latest updates availalble. When it’s finished, type the following command:
sudo apt-get upgradeThis will actually upgrade the software on the Pi with the latest updates from the catalogue.
Once the Pi has finished updated, type the following command to reboot it:
sudo restartPreparing Your Router
There are a couple of things that need setting up on your router, but the specifics will depend on your router model so I encourage you to refer to the manufacturer or to your ISP. The notes below are general guidance on what needs to be done:
1) Setup Dynamic DNS
Dynamic DNS (or DDNS for short) is a way of mapping your routers public IP address to a free URL (like a website address). Doing this will ensure that you have a consistent address for accessing your VPN server. Most ISPs use dynamically assigned IP addresses, so this is an important step as it ensures you can still connect to your Pi even when the IP address of your router changes.
Most modern routers have a DDNS feature built in, so refer to the manufacturer or your ISP for details on how to turn it on (Google is your friend).
There are multiple DDNS providers available, I recommend NOIP who offer up to three DDNS addresses on their free service.
2) Setup Port Forwarding
Port Forwarding allows your router to forward specific types of traffic (in this case VPN traffic) to a specific device on your network. The specifics of what you need to do will depend on your router, so once again you’ll need to check how to do it with your ISP or router manufacturer.
You will need to set UDP traffic on port 51820 to go to the LAN IP address of your Pi. I recommend you pick a random address outside of your DHCP range and use that to setup your port forwarding rule, we’ll be programming the Pi with this address later on.
Installing PiVPN
Once the Pi has rebooted you’re ready to install PiVPN, the VPN server software which will allow other devices to connect to your home network.
To do this, open a new Terminal window and type the following:
curl -L https://install.pivpn.io | bashAfter a few seconds you should see a screen like this one:

Click OK and you’ll be advised to change the IP settings of your Pi:

Click OK and you’ll be shown your current IP address. I highly recommend that you set a static IP address for your Pi. Reason being that if your router or Pi reboots you may end up with a new IP address, and that will mean that we have to change settings on our router each time (more on that later).

To avoid IP address conflicts I recommend you select no to the following question:

I recommend you choose an address outside of your routers DHCP pool, this will avoid IP Address conflicts down the line. Below is a suggestion, but you should refer to your router to confirm a suitable address:

Click OK and you’ll be prompted to enter the Default Gateway address, this will be the IP address of your router:

Enter the IP and click OK. You’ll be prompted to confirm the details are correct:

Hit enter to confirm. You’ll be asked to confirm a user to hold configurations:

Hit enter for OK, you’ll be asked to confirm the user, which for a virgin Raspberry Pi system will show a list of one user:

Press OK. You’ll be presented a window where you’re asked to choose between Wireguard and OpenVPN:

I recommend you choose WireGuard, so click OK. PiVPN will then install the packages necessary:

Once all the packages are installed you’ll be asked to choose your DNS provider:
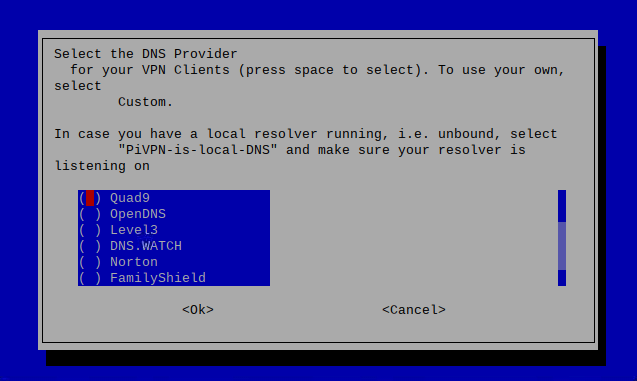
I recommend you choose the Google option, which is one of the most popular public DNS services out there and boasts a good level of service.
You’ll then be asked whether your clients will use a public IP or a DNS entry (DDNS, as above):

Choose the DNS Entry option and you’ll be prompted to enter your DDNS address:

Enter your DDNS address and select OK. You’ll be prompted to confirm it’s correct:

It’s essential you make sure the information is correct at this point, as PiVPN will shortly write the certifcate files needed to connect to the server, and they contain the DDNS information you’ve provided. Once you’re certain you’ve entered the correct information, select Yes.
You’ll be informed the keys are now being generated:

Select OK.
You’ll be informed about upgrades:

And asked if you want to enable unattended upgrades, which I suggest you do:

Files will be installed and you’ll be informed that installation is complete:

Select OK and you’ll be prompted to reboot, which I suggest you do.
Once back at the desktop, open a new Terminal window and type:
pivpn addYou’ll be asked to produce a unique name for your client. Something like “davesphone” will work.
PiVPN will then generate the necessary files for connecting to the VPN. This file then needs to be transferred to whichever device you wish to connect to your VPN. The easiest way to do this is to open a web browser and login to your email provider, then email the files to yourself so they can be accessed on any device with email access. You could also copy the files to a USB drive to be copied to your other devices.
You’ll also need to isntall the WireGuard client for your device, you can find those here.
Once you’ve installed the client on your device (Windows shown below) you can import the certificate file and then connect to your VPN by clicking the Activate button, happy days!
