

Now that we have our RAID array setup and working it would be nice if we could actually STORE some data on our home server. In this part I’m going to show you how you can setup some folders on your array from the command line and then share those folders across your network.
Once this is setup you’ll be able to drag and drop your files from any other Windows, Mac or Linux machine.
The first step is to set up some folders on your server. To do this we need to use the MKDIR command (MaKe DIRectory).
I would recommend creating a single folder called “root” first:
sudo mkdir /mnt/md0/root
The reason for doing this is that it can be tricky to set up network shares for the root of a drive, they generally need to be setup for folders within that drive. By adding a folder called “root” into which we dump all of our data, we’ll be able to setup a single share that contains all of our data later on.
The next step is to navigate to our new directory within the command line interface:
cd /mnt/md0/root
Useful tip: The Linux command line works on the basis that you’re trying to accomplish something inside whichever directory it’s currently navigated to. When you open a terminal window it will default to your home directory. Changing to the directory we’re interested in (the root folder on our RAID array) allows us to truncate commands as Linux will fill in the blanks on the assumption that we intend for it to make the changes in the directory we’re currently in.
So, to create further directories we just need to run commands as above for the new directories, here are some examples:
sudo mkdir video
sudo mkdir music
sudo mkdir photos
sudo mkdir backups
sudo mkdir downloads
sudo mkdir documents
These are just examples. The point is from here you can create whatever folder structure you like, and it can be good practice getting to grips with Linux commands.
Next we’ll need to setup a method of actually accessing these folders from elsewhere on our network. To do this we’re going to use a piece of software called Samba.
The first step is to install Samba:
sudo apt-get update
sudo apt-get install samba
You’ll need to press “y” when prompted to continue, the Samba application will then download and install.
Once installed the next step is to setup a password for your user name to be used with Samba. This should be different from your account password for security reasons. Type:
sudo smbpasswd -a <your user name>
You’ll be prompted to enter a password and then repeat it. Make sure you record this password as you’ll need it when trying to connect to your shares from another device.
Next you’ll need to edit a configuration file. To open the file in the Terminal’s text editor type:
sudo nano /etc/samba/smb.conf
A large text file will open and you’ll find you can use the cursor keys on your keyboard to navigate it. Use the down arrow to go all the way to the bottom of the document and then add the following text:
[root]
path = /mnt/md0/root
valid users = <your user name>
read only = no
Next press ctrl+O, this is the shortcut to save the file, press enter on your keyboard to save, then press ctrl+X to close the text editor
Next you’ll need to restart the Samba service so that the changes take effect. To do this type the following command into the Terminal:
sudo service smbd restart
And we’re done! The only thing that remains to be done is to test whether we can access our network shares from another device. Within Windows we do this by mapping a network drive.
Mapping a Network Drive
From within the Windows File Explorer, right click the “This PC” entry in the left-hand navigation pane and select “Map Network Drive”
This will open the following window:
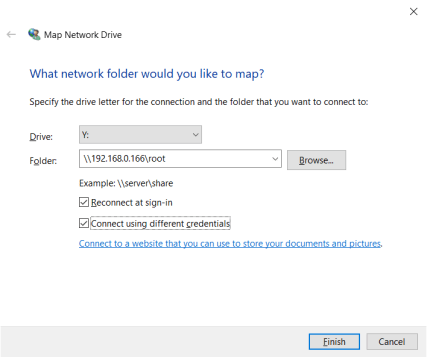
Type in the address of your folder in the format shown above, supplementing in your server’s IP address in place of the example above.
Make sure the “Reconnect at sign-in” and “Connect using different credentials” boxes are both selected and click Finish.
You’ll then be prompted to enter a username and password. Enter your servers username and the password you setup during the Samba installation and click ok. You should then find that a window opens showing all of the folders you setup on the server, as below:

You should now be able to add any feels you need to your server by dragging and dropping!
This is an important milestone for our server build; we now have information stored on it in relative safety through the use of a RAID 5 array.
It’s important to point out at this point that although RAID 5 does protect us against loss of one of our hard disks, it does nothing to protect out data in the event that the server itself is compromised. For that reason I always recommend that you keep a safe copy of your data somewhere else, particularly if the data is important or holds sentimental value (think photographs).
My recommendation would be to invest in a seperate USB hard disk to backup your data to, which can then be stored in a different location to your server. That way in the event of fire, burglary, flood or any other nasty things we wish never to happen, you still have a copy of all your data.
And that’s it for Part 4. In Part 5 we’ll be looking at setting up our server to index and stream media to other devices on our network, and beyond!
Matt, I lost myself a little bit the last two posts (I am new to all this).
Let’s say you have the Unbutu OS installed and nothing else. You have then created a RAID system and files into it all from the command line, but my questions will be:
1) Why not to install FreeNas to manage the RAID system? (I though this was a very good software for that)
2) If you install NextCloud later on, do you need to create folders yourself or are the folders managed/created/deleted by NextCloud? Or does NextCloud store everything inside user folders that can coexist with the ones you created in part 4?
If you had NextCould, would you create this generic say “photo” folder inside NextCloud to share with users or have them outside NextCould and share them via…Samba? (you lost me there on why you need samba to see a folder that is on the network).
To be honest, for beginners like me, it would be nice to see a post about how all these services can coexist in the server (FreNas, NextCloud, PLex, Other RAID systems,…) and how they may clash. I have been doing a lot of research but there are too many different configurations and advice out there.
Sorry if these questions are to basic.
P
Hi Pedro, thanks for the questions.
You could definitely create a usable NAS drive with FreeNAS, I chose to use Ubuntu instead as it gives you a greater deal of flexibility, but as you’re finding out it can be tricky for those not familiar with Linux.
If you install Nextcloud it will create a folder to store all your data within its folder structure. In my case I chose to keep this in the suggested location, but you can elect to put it on your RAID setup instead. The reasons I didn’t do so were two-fold:
1) If I’d installed on the RAID array then the continued access requests from all my devices (main PC, laptops, mobile phone) would mean that my RAID array hard disks would never go to sleep, as such they’re likely to wear out a lot quicker. Installing on the boot drive (which in my case was an SSD) means that I don’t suffer from this problem.
2) I ran into permissions issues with having folders setup on my RAID array and accessible by Nextcloud. Because of the above point I didn’t look further in how to achieve it.
On your point on different services; FreeNAS is actually an operating system in its own right, so it wouldn’t coexist with the other apps but rather provide a platform for them. There are several services like Plex which can be made to run on FreeNAS, you’d have to look elsewhere for advice on this. With regard to the others you’ve mentioned; Plex and nextcloud (and a couple of other apps) will coexist peacefully if you follow the steps I’ve mentioned throughout these articles. I’ve been running this exact setup for 8 months now, with no issues.
Thanks for the comment and best of luck with your solution!
Hi Matt,
I think I got a problem with the array because when I try to drag any kind of files from my desktop to my server, example, I want to drag a movie from my desktop to the video file it say: Destination Folder Acces Denied. You need permission to perform this action. Do you need where is the problem and how to fix it. Thanks for all you do this is really useful.
This is a common problem, your RAID array is likely fine, this sounds like a folder permission error. If you Google Linux folder permissions there are plenty of really helpful guides out there that discuss Linux file permissions
HI, thanks for you answer, but now I got news,
I just copy and past the command lines of the part 3 and then I got another situation. I got : Restoring Network Connection. An error occurred while reconnecting to the drive ip adress. Microsoft Windows Network : The local device name is already in use. This connection has not been restored. Plus I see the copying windows open but will not start. So I guess I don<t have the problem of the permission. I cant see what that mean the local device name is already in use but it looks like an issue from windows..
OK,
so I reboot my server and my desktop and then I got again this message : You need permission to perform this action. So I<ll do as you told me and google linux folder permission… i'll try 😉
Alright,
I think I resolved my problem and it might helps other users who encountered or will be face of the same problem,
This command line allows my to drag files :
sudo chmod -R 777 /mnt/md0/root
But does it destroyed my security parameters?
Thanks for your opinions and comments.
I try to acces my ubuntu server with Linux Mint, any idea about network mapping on mint?