

I am a huge, huge lover of the Raspberry Pi platform and have used them all over the house for years now, but even I would have to admit that the built in audio capabilities are pretty dire.
That’s not really surprising, the Raspberry Pi was designed as an educational tool, it just happens to have been taken on by the hacking/modding community.
I’ll preface the rest of this review by saying that audio add-on boards for the Raspberry Pi are not a new thing, there are plenty of options out there and not all are supported by all software platforms, so if you have a specific software in mind make sure you check that it supports the RaspyPlay 4 before buying!
The board itself is relatively small, as you might expect, and is designed to connect to the GPIO pins on the Raspberry Pi board. Seeing as the GPIO layout hasn’t changed since the first iteration of Pi you should be able to connect it to any version you like. I’ve connected it to a Raspberry Pi 3 for this review.
The RaspyPlay 4 features a PCM5122 DAC from Texas Instruments featuring 48KHz sampling and Dynamic Range Control. I’ll confess to knowing nothing about this chip really but a quick Google shows that it’s held in pretty high regard and is the heart of many a DAC out there.
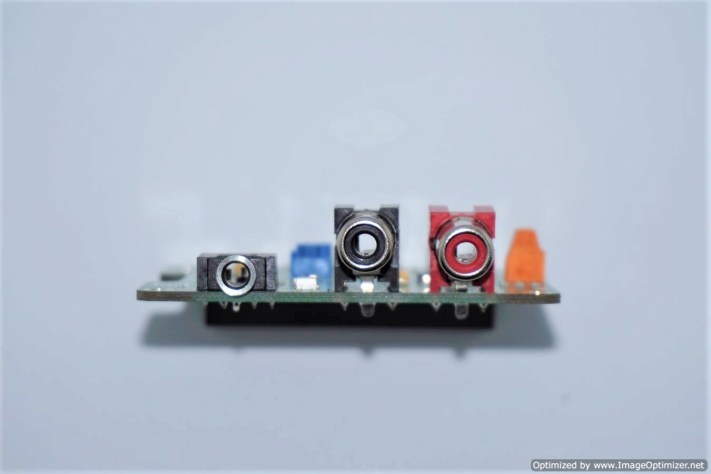
In terms of output from the board you have a 3.5mm line-out connector as well as twin-RCA connectors. It would have been nice to see a TOSLINK or coaxial output as well, as only having analogue outputs might prove restricting for some uses, but this would have added to the bulk and cost of the device so I’m ok with it.

To one end of the board is a header socket for a mute button. Reading through the details for the DAC chip itself it seems this is a built-in function that applies -120dB to the levels, though with no information present on intended use it’s difficult to work out how to use this feature.
Atop the board are solder pads for a 16 x 2 LCD display, these are passthrough connections from the GPIO pins on the Raspberry Pi, allowing you to use a 16×2 display if your chosen software package supports it. I didn’t use this functionality in my system, but it’s a useful addition and will surely be handy if you’re planning on building a bespoke system around the Raspberry Pi.

Overall I like the look of the board, it sits atop the Pi well and is well laid out. I do have two small criticisms though. The first is that the unit I was supplied with didn’t feature any stand-offs to mount it to the Raspberry Pi properly. However, the required holes are on the RaspyPlay 4 board so it would just be a case of ordering the correct height stand-off. Still, it’s a shame these weren’t supplied out of the box as it would only have cost a couple of pennies for the manufacturer to do so.
The second is slightly stranger and a bit of a pain. For whatever reason, and this may just be the batch my sample came from, the manufacturer has used two different types of RCA header, with the black header sitting noticeably prouder. This gave me a few issues when I came to modifying my case in the video below. If nothing else it just looks slightly odd, and bugs me probably more than it should.
In terms of software for the RaspyPlay 4, several existing software packages already include drivers for the board including RuneAudio, Moddle Audio and Max2Play. I used the board with RuneAudio and found the setup to be pretty seemless with only a couple of configuration changes required to make it work.
In the video above you can see me retrofit the RaspyPlay4 into a case with the official Raspberry Pi display and demonstrating the difference in quality. It’s not immediately clear in the video but there is a significant difference in quality between the Raspberry Pi’s build in audio processing and the RaspyPlay4.
Connecting the unit up to my home Hi-Fi the difference is stark. The Raspberry Pi’s audio output makes an expensive system sound like a £20 bluetooth speaker, the RaspyPlay4 provides performance equal (to my ears) to my amplifiers built in network streaming functionality when listening to FLAC files.
That’s not to say that high-end audiophiles won’t notice a difference. I have a friend who swears blind he can hear the difference between different speaker wires. But for those with sub £1000 HiFi systems like mine it would be difficult to pickout the difference between using the RaspyPlay4 or the amplifiers built in DAC.
To reiterate my first point; there are many DACs avaialable for the Raspberry Pi, some with better features and software support. But if you’re looking for a relatively cheap DAC and you’re willing to use one of the software packages that support it, then the RaspyPlay4 should definuitely make your shortlist. The ease of use and overall sound quality make it a fantastic upgrade for the Raspberry Pi and it would be difficult to argue against using it.
Those in the UK can pick up a RaspyPlay4 board from The Debug Store.